Website migration between shared hosting providers is a process that every website owner may face at some point — whether motivated by better performance, lower pricing, improved features, superior support, or simply outgrowing the current hosting environment. Despite its importance, hosting migration remains one of the most anxiety-inducing tasks for website owners because the potential consequences of migration errors — extended downtime, data loss, broken functionality, and email disruption — can significantly impact both the website and the business it supports.
This guide provides a comprehensive, systematic approach to shared hosting migration that minimizes risk and ensures a smooth transition between hosting providers. The methodology covers pre-migration planning, execution steps, and post-migration verification, with specific attention to WordPress migration considerations that apply to the majority of shared hosting websites. Understanding the complete migration process enables website owners to plan, execute, and verify successful hosting transitions whether they perform the migration themselves or oversee a migration service handling the technical details.
Pre-Migration Planning
Successful hosting migration begins with thorough planning that identifies all components requiring transfer, establishes a migration timeline, and prepares fallback procedures in case issues arise during the process. Pre-migration planning should begin well before the actual migration date to ensure adequate preparation time.
Inventory Assessment
Creating a complete inventory of everything hosted on the current account is essential before beginning migration. The inventory should include: all website files including themes, plugins, and uploads; databases and their associated applications; email accounts, forwarding rules, autoresponders, and mailing lists; DNS records including custom records, MX records, and subdomains; cron jobs and scheduled tasks; SSL certificates and their configuration; custom PHP settings and .htaccess rules; and any additional services like analytics tracking codes or CDN configurations.
Backup Everything
Creating comprehensive backups before migration provides the essential safety net that enables recovery if migration issues occur. Full cPanel backups capture the complete account including files, databases, email, and settings. WordPress-specific backups through plugins like UpdraftPlus provide application-level backup restoration. Database exports through phpMyAdmin provide direct database restoration capability. These backups should be stored locally and in cloud storage — not solely on the hosting account being migrated.
New Hosting Preparation
Before initiating the migration, the new hosting account should be fully set up and configured: hosting plan activated, domain added as the primary or addon domain (without changing DNS yet), SSL certificate provisioned, email accounts created to match the current configuration, and PHP version set to match the current hosting environment. Creating the new hosting environment in advance allows testing and configuration before the DNS switch that makes the migration live.
Migration Methods
Provider Migration Services
Most shared hosting providers offer free website migration services for new customers. Migration services handle the technical transfer process including file copy, database migration, email configuration, and DNS guidance. Using the provider’s migration service is the recommended approach for non-technical users because the migration team handles the technical complexity and has experience with the specific hosting infrastructure being migrated to.
Migration service quality varies between providers. Some providers offer fully managed migrations where the team handles every aspect of the transfer, while others provide partial assistance that requires customer involvement for certain steps. When evaluating migration services, inquire about the migration scope, timeline, downtime expectations, and support available if issues arise after migration completion.
Manual Migration
Manual migration provides complete control over the transfer process and is preferred by technically experienced users who want to manage every migration step. The manual migration process involves downloading all website files from the current host via FTP/SFTP, exporting databases through phpMyAdmin, uploading files to the new hosting account, importing databases on the new host, configuring database connection settings in the application configuration, testing the site on the new hosting before DNS changes, and updating DNS to point to the new hosting server.
Plugin-Based WordPress Migration
WordPress migration plugins provide automated migration tools that simplify the transfer process. Plugins like All-in-One WP Migration, Duplicator, and UpdraftPlus can export complete WordPress installations as downloadable packages that can be imported on the new hosting account. Plugin-based migration handles file transfer, database migration, and URL search-and-replace operations automatically, reducing the technical complexity of WordPress-specific migration tasks.
Plugin-based migration works well for WordPress sites within shared hosting storage and resource limits. Very large WordPress installations may exceed plugin-based migration file size limits, requiring manual migration or provider migration services for the transfer.
File Transfer Process
Website files need to be transferred from the current hosting to the new hosting account. FTP/SFTP clients like FileZilla provide the standard file transfer method, connecting to the current host to download all files and then connecting to the new host to upload them. The transfer includes all files in the public_html directory including WordPress core files, theme files, plugin files, uploaded media, and configuration files.
File transfer time depends on the total file size, internet connection speed, and the file count. Large media libraries with thousands of images can extend transfer time significantly. Compressing files into archives before transfer and extracting on the new host reduces transfer time by consolidating thousands of small files into a single archive that transfers more efficiently.
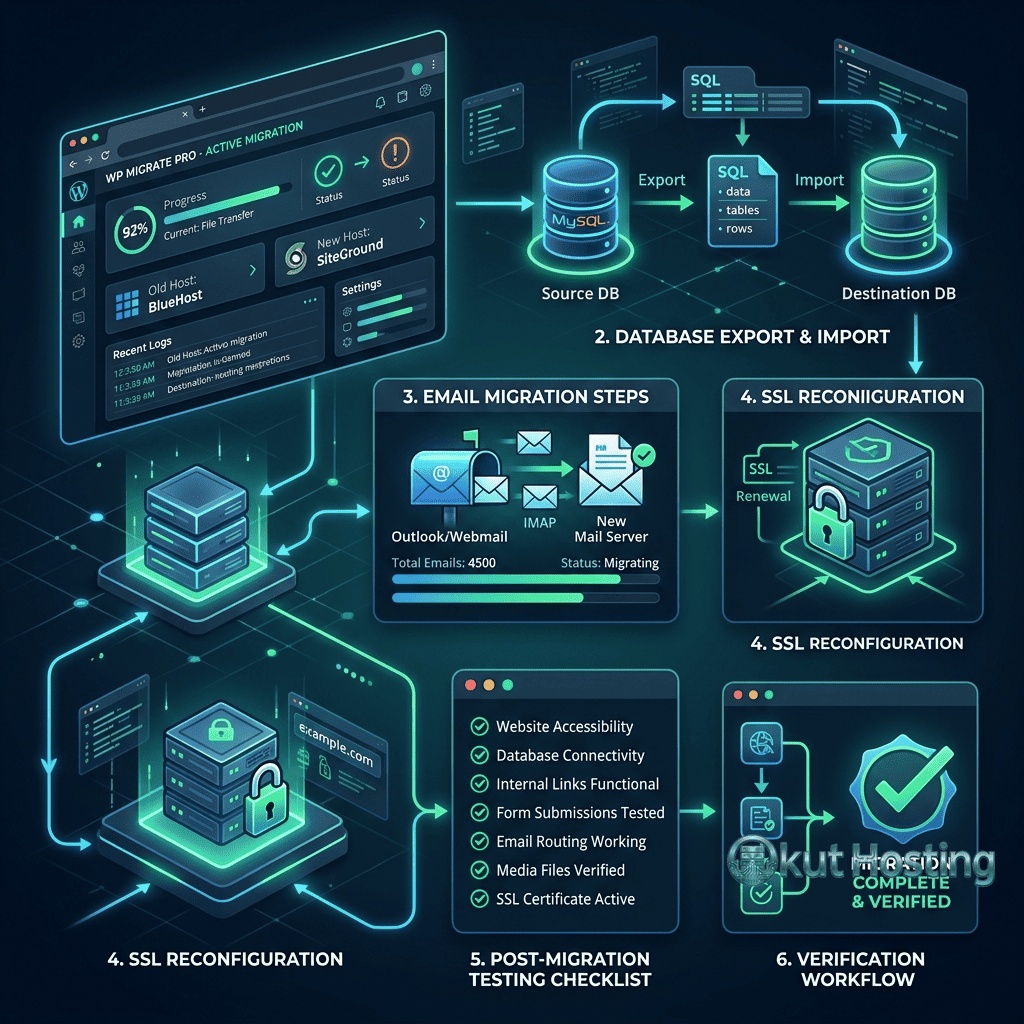
Database Migration
Database migration requires exporting the database from the current host and importing it on the new host. phpMyAdmin provides the standard database management interface on shared hosting, with export and import functionality for MySQL/MariaDB databases. The export creates a SQL file containing the database structure and data that can be imported on the new hosting account’s database server.
After importing the database, the application’s database connection configuration must be updated to use the new hosting account’s database credentials. For WordPress, this means updating the wp-config.php file with the new database name, username, password, and host. If the new hosting uses a different database host than “localhost,” this configuration change is essential for database connectivity.
URL search-and-replace operations may be needed if the site URL changes during migration (for example, if the domain temporarily uses the new host’s temporary URL for testing). WordPress stores absolute URLs in the database, and changing these URLs requires search-and-replace operations through tools like WP-CLI’s search-replace command or the Better Search Replace plugin.
DNS Management
DNS (Domain Name System) management is the critical step that switches visitor traffic from the old hosting to the new hosting. Changing the domain’s nameservers or A records to point to the new hosting server’s IP address redirects all domain traffic to the new hosting account. This DNS change is the moment when the migration becomes live for visitors.
DNS propagation — the time required for DNS changes to spread across the global DNS system — typically takes 24 to 48 hours, though many DNS changes propagate within hours. During propagation, some visitors will reach the old hosting while others reach the new hosting. This propagation period is why both hosting accounts should remain active and functional during the migration transition.
Reducing DNS TTL (Time to Live) values before migration accelerates propagation. Setting DNS TTL to a low value (300 seconds) several days before migration ensures that DNS resolvers cache the records for shorter periods, enabling faster propagation when the DNS records are changed to point to the new hosting. After migration is complete and verified, TTL can be increased to normal values.
Email Migration
Email migration requires special attention because email disruption can affect business communications. Email accounts need to be recreated on the new hosting with the same addresses, passwords, and configurations. Email forwarding rules, autoresponders, and mailing list configurations need to be replicated on the new hosting. MX records must be configured correctly to route email to the new hosting’s mail servers.
During DNS propagation, emails may be delivered to either the old or new hosting. Maintaining both email systems active during the propagation period prevents email loss. After propagation is complete and all email traffic routes to the new hosting, old hosting email data can be migrated or archived as needed.
SSL Certificate Configuration
SSL certificates need to be configured on the new hosting to maintain HTTPS functionality. Most shared hosting providers offer free SSL certificates through Let’s Encrypt that can be provisioned through cPanel’s SSL management interface. SSL certificate provisioning typically requires the domain’s DNS to point to the new hosting server, which means HTTPS may not be fully functional on the new hosting until DNS propagation completes.
For sites that use paid SSL certificates, the certificate and private key need to be transferred to the new hosting account’s SSL configuration. This transfer ensures uninterrupted HTTPS functionality after the DNS switch.
Downtime Minimization
Minimizing downtime during migration requires strategic timing and preparation. The optimal migration approach involves completing all file and database transfers before the DNS switch, testing thoroughly on the new hosting using temporary URLs or hosts file modifications, and switching DNS only after confirming that the new hosting environment functions correctly. This approach reduces effective downtime to the DNS propagation period, during which some visitors reach the old host and others reach the new host — both serving functional websites.
Scheduling the DNS switch during low-traffic periods (typically late night or early morning in the primary audience’s timezone) reduces the number of visitors affected during the propagation window. Communicating planned maintenance windows to users through website notices or email notifications sets appropriate expectations for any brief disruptions during the transition period.
E-Commerce Migration Considerations
E-commerce websites require additional migration planning because active orders, customer accounts, payment gateway configurations, and shopping cart sessions are affected by the hosting transition. Migrating during low-order periods reduces the risk of lost transactions during the DNS propagation window. Payment gateway configurations (API keys, webhook URLs, callback URLs) may need updating on the new hosting to maintain payment processing functionality.
Order data integrity is critical during e-commerce migration. Ensuring that the database export captures all current orders, customer records, and product data is essential for maintaining business continuity. Testing the complete purchase workflow on the new hosting — from product browsing through checkout and payment processing — verifies that e-commerce functionality operates correctly before the migration goes live.
SEO Impact Management
Website migration can potentially affect search engine rankings if not managed correctly. The primary SEO concerns during migration include URL structure changes, temporary site unavailability during DNS propagation, and server response time differences between hosting providers. Maintaining identical URL structures between old and new hosting preserves link equity and prevents broken internal and external links.
If URL structures change during migration, 301 redirects must be configured on the new hosting to redirect old URLs to their new equivalents. Submitting an updated sitemap to Google Search Console after migration helps search engines discover and index the content on the new hosting efficiently. Monitoring Google Search Console for crawl errors after migration enables rapid identification and resolution of any URL issues that affect search engine visibility.
Migration Timeline and Checklist
A recommended migration timeline spans approximately two weeks from initial planning to post-migration verification. Week one focuses on preparation: account setup on the new hosting, comprehensive backups, DNS TTL reduction, and email account creation. Week two covers execution: file and database transfer, testing on the new hosting, DNS switch, monitoring during propagation, and post-migration verification. This two-week timeline provides adequate time for thorough preparation and testing without unnecessarily extending the migration period.
Post-Migration Testing
Thorough testing after migration verifies that all website components function correctly on the new hosting. Testing should cover: all pages loading correctly with proper formatting and images; forms submitting correctly and delivering to correct email addresses; database-driven functionality operating properly; SSL certificate configured and HTTPS working; email sending and receiving functioning; cron jobs and scheduled tasks executing; 404 error handling working correctly; and site performance acceptable on the new hosting.
Testing can begin before the DNS switch by using the new hosting’s temporary URL or by modifying the local hosts file to resolve the domain to the new hosting server’s IP address. This pre-DNS testing enables identifying and resolving issues before the migration goes live for all visitors.
Old Hosting Account Management
After migration is complete and verified, the old hosting account should be maintained for a buffer period before cancellation. This buffer period — typically 30 to 60 days — provides a safety net for discovering late-appearing issues, accessing old email archives, or retrieving files that were not included in the initial migration. During this period, the old hosting account serves as a backup resource that can be used for recovery if post-migration issues are discovered.
Before cancelling the old hosting account, verify that all data has been successfully migrated and is accessible on the new hosting. Download any remaining backups, email archives, or files that may be needed in the future. Note the old hosting account’s renewal date to avoid unexpected charges. If the old hosting includes domain registration, ensure the domain’s registration is transferred or renewed through the appropriate registrar before the hosting account is cancelled.
Choosing Between Migration Approaches
The choice between provider migration services, manual migration, and plugin-based migration depends on technical comfort level, website complexity, and migration timeline requirements. Provider migration services are best for non-technical users who want the migration handled professionally. Manual migration provides maximum control for technically experienced users. Plugin-based migration offers a middle ground with automated tools that simplify the process while maintaining user control. For complex sites with custom configurations, combining approaches — using plugin-based migration for WordPress and manual methods for custom files and configurations — can provide the most thorough migration coverage.
Common Migration Issues
- Database connection errors: Usually caused by incorrect database credentials in the application configuration file. Verify database name, username, password, and host in wp-config.php.
- Broken images and links: Often caused by hardcoded absolute URLs that reference the old hosting. Search-and-replace operations fix these references.
- Email delivery failures: Usually caused by incorrect MX record configuration or email accounts not recreated on the new hosting.
- SSL certificate issues: Typically resolved by provisioning a new SSL certificate on the new hosting after DNS propagation.
- PHP version incompatibilities: Application errors may occur if the new hosting runs a different PHP version. Matching PHP versions between hosts prevents compatibility issues.
- File permission errors: Transfer methods may change file permissions. Setting correct permissions (644 for files, 755 for directories) resolves permission-related errors.
Summary
Shared hosting migration is a systematic process that becomes manageable with proper planning, comprehensive backups, and methodical execution. The key principles are: plan thoroughly before starting, back up everything multiple times, test on the new hosting before switching DNS, keep both hosting accounts active during DNS propagation, and verify all functionality after migration completes. Whether using provider migration services, manual migration, or plugin-based tools, following these principles minimizes risk and ensures successful hosting transitions.
For website owners planning a hosting migration, understanding the complete process — from pre-migration planning through post-migration verification — provides the knowledge needed to manage the migration confidently, communicate effectively with migration service teams, and resolve issues that may arise during the transition between hosting providers.
This guide provides general migration methodology applicable to shared hosting environments. Specific migration steps may vary depending on the hosting providers, control panels, and web applications involved. Okut Hosting is an independent review platform with no affiliate relationships with any hosting company mentioned in this article.
For related content, see our Bluehost vs HostGator comparison, our uptime comparison guide, and our shared hosting limitations guide.