Migrating a WordPress site between hosting providers is one of the most consequential technical operations a site owner or developer undertakes. The migration process involves transferring every component of a WordPress installation — the database containing all content and settings, the file system containing themes, plugins, and uploaded media, the server configuration that determines how WordPress runs, and the DNS records that direct visitors to the correct server. Each of these components must be transferred correctly and synchronized to produce a functional WordPress site on the new hosting environment.
The importance of getting migration right cannot be overstated. A failed or incomplete migration can result in data loss, broken functionality, extended downtime, SEO ranking drops, and visitor confusion. Conversely, a well-executed migration should be invisible to site visitors — the site continues to function normally on the new hosting provider with the same content, functionality, and URLs, but with the improved performance, features, or pricing that motivated the migration. This guide covers the migration process comprehensively, from pre-migration planning through post-migration verification, providing the knowledge needed to execute a successful WordPress hosting transfer.
Pre-Migration Planning
Successful migration begins with thorough preparation before any files or databases are transferred. The pre-migration phase involves inventorying the current WordPress installation, understanding its configuration, and planning the migration approach based on site complexity, acceptable downtime windows, and technical capabilities.
Creating a complete inventory of the current WordPress installation includes documenting the WordPress version, active theme and its version, all installed plugins and their versions, custom code modifications, server-level configurations (PHP version, memory limits, custom php.ini settings), and any non-WordPress files or applications running on the hosting account. This inventory serves as a reference during migration to verify that all components have been transferred and are functioning correctly on the new host.
Identifying potential migration complications early prevents surprises during the transfer. Sites with custom server configurations — .htaccess rules, custom PHP settings, cron jobs, or server-level redirects — require those configurations to be recreated on the new hosting environment. Sites using server-specific features like LiteSpeed Cache configurations, Redis connections, or custom Nginx rules need equivalent configurations on the new host. Sites with email hosting on the current provider require separate email migration planning if the new host does not include email hosting.
Choosing a migration window that minimizes impact is important for active sites. Content sites with regular publishing should schedule migrations during low-traffic periods and coordinate with content teams to pause publishing during the transfer. E-commerce sites should schedule migrations during the lowest-sales periods and consider temporarily enabling maintenance mode during the final database synchronization to prevent order data loss.
Manual Migration Process
Manual migration provides the most control over the transfer process and is the preferred approach for complex WordPress installations with custom configurations, multisite networks, or non-standard directory structures. The manual process involves separate handling of files, database, and configuration components.
File migration begins with downloading the complete WordPress installation from the source hosting account. This includes the WordPress core files, the wp-content directory (containing themes, plugins, and uploads), and configuration files like wp-config.php and .htaccess. SFTP or SSH access provides the most reliable file download method, with SCP or rsync preferred for large installations because they can resume interrupted transfers. The downloaded files are then uploaded to the new hosting account through SFTP, ensuring that file permissions are set correctly — typically 755 for directories and 644 for files.
Database migration requires exporting the MySQL database from the source host and importing it into a new database on the destination host. phpMyAdmin provides a graphical interface for database export and import, generating SQL dump files that can be transferred between servers. For large databases, the command-line mysqldump tool provides more reliable exports than phpMyAdmin, which may time out on large datasets. The exported SQL file must be imported into a new database on the destination host, and the wp-config.php file must be updated with the new database name, username, password, and host information.
URL search-and-replace operations are necessary when the site’s domain, directory structure, or URL scheme changes during migration. WordPress stores absolute URLs in the database for links, images, and serialized data. A simple find-and-replace on the SQL file can corrupt serialized data, so specialized tools like WP-CLI’s search-replace command or the Search Replace DB script handle serialized data correctly. This search-and-replace step is critical — failure to update URLs correctly results in broken images, incorrect links, and non-functional WordPress settings.
Plugin-Based Migration
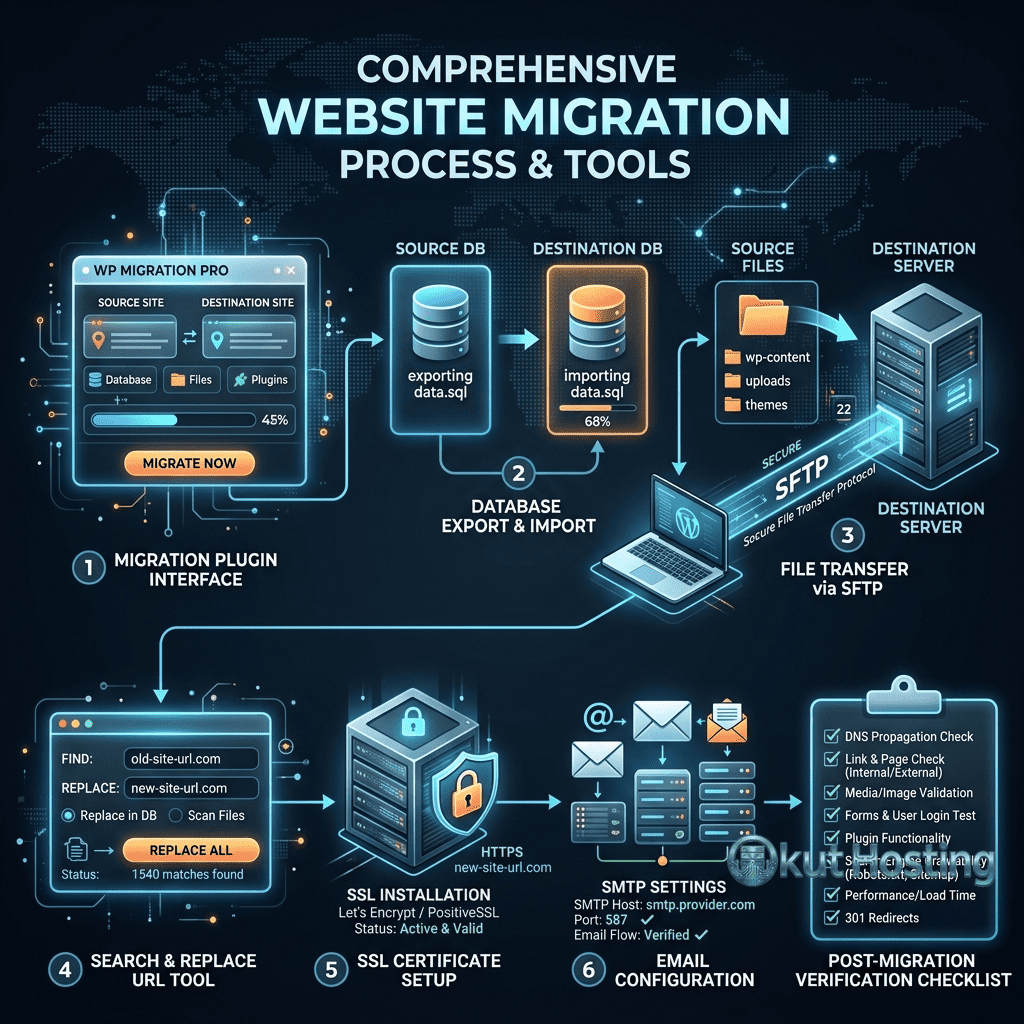
WordPress migration plugins automate much of the manual migration process, making hosting transfers accessible to users without command-line or database management experience. Popular migration plugins package the WordPress files and database into downloadable archives that can be uploaded and restored on the destination host.
The typical plugin-based migration workflow involves installing the migration plugin on the source WordPress site, creating a full site backup or migration package, downloading the package, installing WordPress and the migration plugin on the destination host, and uploading and restoring the migration package. The plugin handles file extraction, database import, URL search-and-replace, and configuration updates automatically.
Popular migration plugins include All-in-One WP Migration, Duplicator, UpdraftPlus, and WPvivid. Each plugin handles migration differently — some create single-file archives, others split large sites into multiple packages, and some support direct server-to-server transfers without downloading and re-uploading. Plugin selection should consider the site size (some plugins have free-tier size limits), the complexity of the migration, and whether the destination host has any plugin restrictions that might prevent using a specific migration tool.
Plugin-based migration has limitations that should be considered. Large sites may exceed the upload limits of the destination hosting environment, requiring server configuration changes or the use of alternative import methods. Complex server configurations, custom cron jobs, and non-WordPress files are typically not captured by migration plugins and must be transferred manually. Sites with extensive custom code outside the standard WordPress directory structure may require supplemental manual transfers alongside the plugin-based migration.
WP-CLI Migration
WP-CLI — the command-line interface for WordPress — provides migration capabilities that combine the control of manual migration with the automation of plugin-based approaches. The wp db export and wp db import commands handle database export and import operations. The wp search-replace command performs URL updates with proper handling of serialized data, preventing the data corruption that can occur with simple find-and-replace operations on SQL files.
A WP-CLI migration workflow typically involves exporting the database with wp db export on the source, transferring files via rsync or SCP, importing the database with wp db import on the destination, running wp search-replace for URL updates, and flushing caches with wp cache flush. This workflow can be scripted for repeatable migrations, which is particularly valuable for agencies and developers who perform migrations frequently. WP-CLI migration requires SSH access on both source and destination hosts, which is available on most managed and VPS hosting plans but may not be available on basic shared hosting.
E-Commerce Migration Considerations
WooCommerce and other WordPress e-commerce sites require additional migration considerations because they handle financial transactions and customer data. The migration window should be coordinated with the store’s operational schedule to avoid migrating during active order processing. Enabling maintenance mode during the final database synchronization prevents new orders from being placed on the source server after the database export, ensuring that no transaction data is lost during the transfer.
Payment gateway configurations must be verified on the new hosting environment. Some payment gateways use IP-based whitelisting for API access, requiring the new server’s IP address to be registered with the payment provider before migration. SSL certificate provisioning must be confirmed before the migration goes live, as payment gateways require HTTPS connections for transaction processing. Testing the complete purchase flow — product browsing, cart addition, checkout, and payment processing — on the new host before DNS cutover is essential for preventing revenue-impacting issues after the migration.
Host-Provided Migration Services
Many hosting providers offer free migration services as part of their onboarding process. These managed migration services are performed by the hosting provider’s technical team, who handle the complete transfer — files, database, DNS configuration, and testing — on behalf of the customer. Managed WordPress hosts including WP Engine, Kinsta, SiteGround, Flywheel, and Pressable all offer some form of migration assistance.
The advantage of host-provided migration is that the hosting provider’s team has deep familiarity with their platform’s configuration requirements, caching systems, and file structures. They can handle the migration with awareness of their specific environment’s requirements — configuring cache settings, setting up SSL certificates, and ensuring WordPress is configured optimally for their infrastructure. For non-technical site owners, managed migration removes the technical complexity entirely, reducing the migration to a request-and-verify process.
DNS Management During Migration
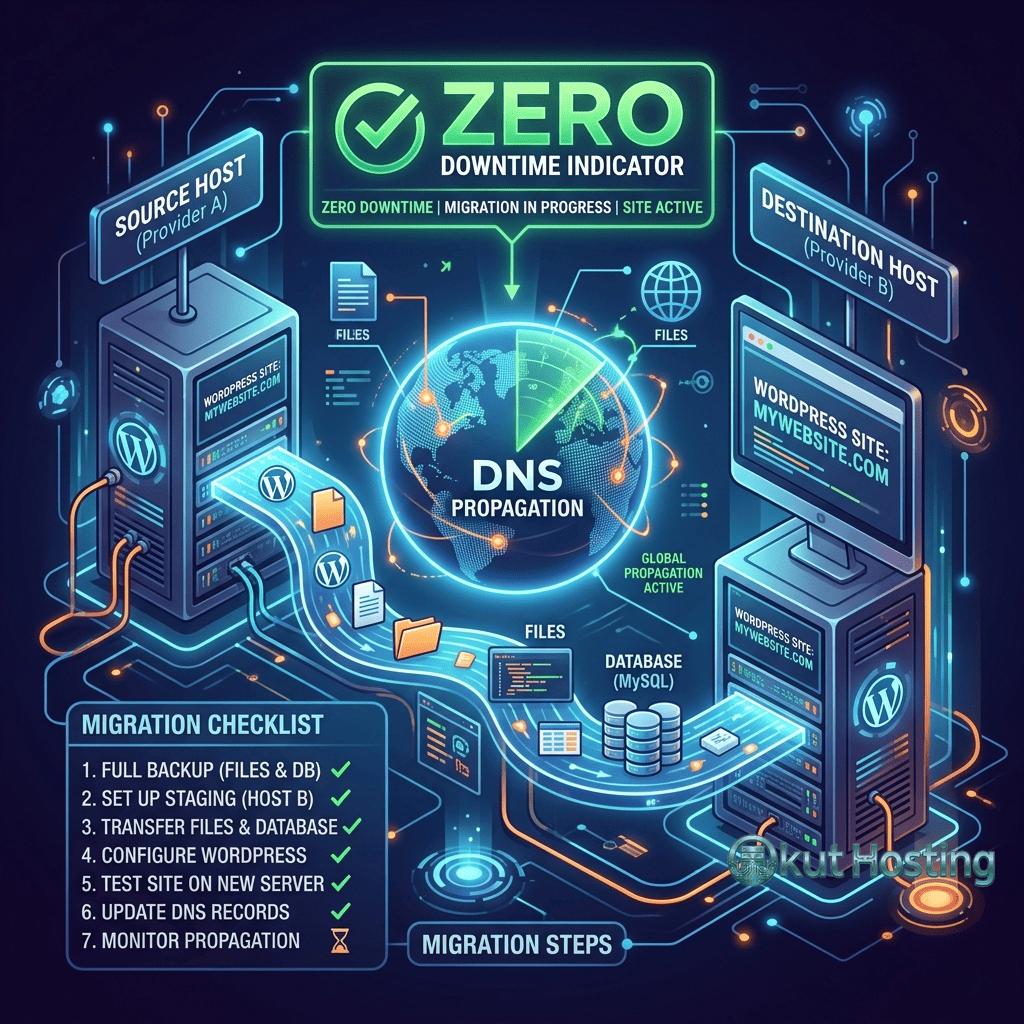
DNS (Domain Name System) management is the mechanism that directs visitors from the domain name to the correct server. During migration, DNS records must be updated to point from the source hosting server to the destination hosting server. Understanding DNS propagation and managing the transition correctly is essential for minimizing visitor disruption during the hosting change.
DNS propagation — the time required for DNS changes to distribute across the global DNS resolver network — typically takes between a few hours and 48 hours. During propagation, some visitors may be directed to the old server while others reach the new server, creating a window where both hosting environments may receive traffic. To minimize issues during this transition period, the site should remain functional on both the old and new hosts until DNS propagation is complete.
Lowering the DNS TTL (Time to Live) value to a short interval — such as 300 seconds — several days before migration causes DNS resolvers to refresh their cached records more frequently. This preparation step reduces the effective propagation time when DNS records are updated to point to the new hosting server. After DNS propagation is confirmed complete, the TTL can be restored to its normal value.
Testing the site on the new host before updating DNS is critical. Most hosting providers offer temporary URLs or support hosts file modifications that enable site testing on the new server without changing DNS. This testing verifies that all content, functionality, and configuration work correctly on the new host before directing live visitor traffic.
SSL Certificate Management
SSL certificate provisioning on the new hosting environment must be completed before or during the DNS transition. Many hosting providers use Let’s Encrypt certificates that require DNS validation — the domain must point to the hosting server for certificate issuance. This creates a coordination challenge: the SSL certificate may not be available on the new host until DNS points there, but visitors may encounter certificate errors during the transition.
Strategies for managing the SSL transition include configuring the hosting provider to serve with the old certificate during transition, requesting manual certificate provisioning before DNS changes, or coordinating the DNS update with immediate certificate issuance. Some hosting providers support pre-migration SSL provisioning through DNS TXT record validation, enabling certificate issuance before the A/AAAA records are updated.
Post-Migration Verification
Thorough testing after migration confirms that all site components are functioning correctly on the new hosting environment. A systematic verification checklist reduces the risk of undetected issues affecting visitors after the migration goes live.
Content verification includes checking that all pages, posts, and media display correctly. Navigation menus, internal links, and widget content should be tested. Image URLs should resolve correctly to the new hosting environment — broken images are one of the most common post-migration issues, often caused by incomplete URL search-and-replace operations or incorrect file permissions.
Functionality testing covers contact forms, search functionality, e-commerce operations (if applicable), user registration and login, comment submission, and any custom functionality implemented through plugins or custom code. Each WordPress plugin should be tested to verify it operates correctly on the new hosting environment — some plugins are sensitive to server configuration differences and may require reconfiguration after migration.
Performance verification compares page load times on the new host against the old host. If migration was motivated by performance improvements, this comparison validates that the expected improvements materialized. Checking server response times, Time to First Byte (TTFB), and full page load metrics provides quantitative confirmation of the hosting change’s impact on performance.
SEO verification ensures that URL structures, meta tags, sitemaps, robots.txt, and canonical tags are intact. Google Search Console can be checked for crawl errors that might indicate migration issues. Submitting an updated sitemap to Google Search Console after migration helps search engines re-crawl the site and update their records.
Rollback Strategy
Every migration should include a rollback plan that enables reverting to the source hosting environment if critical issues are discovered on the new host. The rollback strategy should define the conditions under which a rollback would be triggered, the steps required to revert DNS and restore the source environment, and the time frame during which rollback remains a viable option. Maintaining the source hosting account and its content for a defined period after migration — typically 30 to 60 days — provides the safety net needed for rollback if issues emerge that cannot be resolved on the new host within an acceptable timeframe.
Common Migration Problems
- Broken images: Often caused by incomplete URL search-and-replace or incorrect file permissions on the uploads directory.
- White screen of death: Typically indicates PHP errors from incompatible PHP versions, missing PHP extensions, or incorrect wp-config.php database credentials.
- Redirect loops: Usually caused by conflicting redirect rules in .htaccess or plugin settings, often related to SSL configuration differences between hosts.
- Email functionality loss: Occurs when the source host provided email hosting that the new host does not include, requiring separate email migration or third-party email service setup.
- Permalink issues: May require resaving permalink settings in WordPress admin, particularly when migrating between Apache and Nginx environments.
- Cron job failures: WordPress scheduled tasks may fail if the new host handles wp-cron differently or if custom cron configurations were not recreated.
Summary
WordPress hosting migration requires careful planning, systematic execution, and thorough verification to ensure a successful transition between hosting providers. Whether performed manually, through migration plugins, or via host-provided services, the fundamentals remain the same: transfer all files and database content, update configuration for the new environment, manage DNS transition to minimize downtime, and verify all functionality on the new host.
The migration approach should match the site’s complexity and the technical capabilities of the person performing the migration. Simple content sites may migrate successfully using plugin-based tools, while complex installations with custom configurations, multiple databases, or non-standard directory structures benefit from manual migration or professional migration services. Regardless of the method chosen, thorough pre-migration preparation and post-migration verification are the factors that most influence migration success.
This guide provides general migration guidance based on common WordPress hosting configurations. Specific migration steps may vary depending on the source and destination hosting environments. Always maintain a complete backup of your WordPress site before attempting any migration. Okut Hosting is an independent review platform and does not provide migration services.
For related guides, see our WordPress staging environments guide, our managed vs shared hosting comparison, and our WordPress performance optimization guide.